How to Install Hardwired Under Cabinet Lighting
Lighting plays a crucial role in creating a functional and inviting kitchen space. While overhead lighting is essential, under-cabinet lighting can take your kitchen to the next level by providing targeted task lighting and a warm, welcoming ambiance.
If you’re considering installing hardwired under-cabinet lighting, this article will walk you through the process step-by-step to ensure a seamless and successful installation.
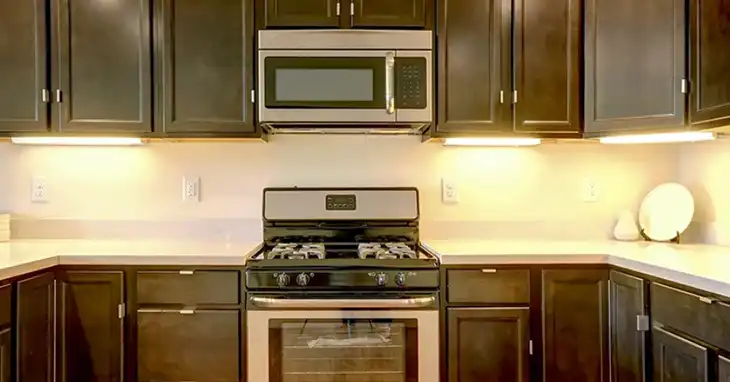
Why Choose Under Cabinet Lighting
Hardwired under-cabinet lighting offers numerous benefits over traditional lighting solutions. Not only does it provide focused illumination for your countertops and work areas, but it also enhances the overall aesthetics of your kitchen. Unlike battery-powered or plug-in options, hardwired lights are seamlessly integrated into your kitchen’s electrical system, ensuring consistent and reliable performance without the hassle of replacing batteries or managing unsightly cords.
Before we dive into the installation process, it’s essential to prioritize safety. Always turn off the power at the breaker box before working with any electrical components. This simple precaution will protect you from potential hazards and ensure a smooth installation process.
Step 1: Planning and Preparation
The first step in installing hardwired under-cabinet lighting is to choose the right type of lighting for your needs. LED strips, puck lights, and linear fixtures are popular options, each offering unique benefits. Consider factors such as brightness, color temperature, and dimming capabilities to find the perfect fit for your kitchen.
Next, assess the size of your cabinets to determine the required number of lights for even illumination. Once you’ve made your selection, gather all the necessary tools and materials, including a lighting kit, a power source (existing switch or new outlet), wire strippers, a drill, a stud finder, a level, screws, cable connectors, and a drywall patch kit (if needed).
Step 2: Finding a Power Source
Before you can install the lighting, you’ll need to identify a power source. This can be an existing switch or electrical outlet, or you may need to install a new switch. If a new switch is required, locate a stud in the desired location, install a double-gang electrical box, and connect the wires following local electrical codes. If you’re unsure about any aspect of the electrical work, it’s best to consult a licensed electrician to ensure safety and compliance.
Step 3: Planning the Wire Path
Once you’ve secured a power source, it’s time to plan the wire path from the source to your cabinets. Map out the most efficient route, considering factors such as minimizing the number of holes and utilizing existing gaps or trim wherever possible. If you need to fish wires through tight spaces, a drill with a right-angle attachment or fish tape can be invaluable tools.
Step 4: Running the Wiring
With your wire path planned, it’s time to start running the wiring. Drill holes as needed for the wire passage, being careful not to damage any existing structures or utilities. As you run the wires, ensure they are properly secured and protected using cable clamps or wire staples. Once the wires reach the cabinet area, connect them to the power source according to the manufacturer’s instructions.
Step 5: Mounting the Light Fixtures
Now it’s time to install the light fixtures themselves. Follow the manufacturer’s instructions carefully for each fixture type, ensuring proper spacing and alignment for even illumination. Use appropriate fasteners for your cabinet material, such as wood screws for wood cabinets, to securely mount the fixtures.
Step 6: Wiring the Lights
With the light fixtures mounted, it’s time to wire them to the electrical system. Connect each fixture to the wiring according to the manufacturer’s instructions, taking care to secure all wire connections using wire nuts or the provided connectors. Double-check every connection to ensure safety and proper operation.
Step 7: Installing Switches and Dimmers
Depending on your preference, you can install under-cabinet switches or wall switches to control your new lighting. Wire and mount the switches according to the manufacturer’s instructions, connecting them to the lighting circuit. If you’ve chosen dimmable lighting, follow the programming instructions to set up the dimming functionality and test it thoroughly.
Step 8: Finishing Touches
As you near the end of the installation process, apply caulk or trim to conceal any visible wires or holes neatly. If you had to route wires through drywall, patch any holes using a drywall patch kit to restore a seamless finish. Finally, turn the power back on at the breaker box and test your new under-cabinet lighting system. Marvel at the improved task lighting and the warm, inviting ambiance it creates in your kitchen.
How to Maintain & Troubleshoot Under Cabinet Lighting
Like any electrical system, your hardwired under-cabinet lighting will require occasional maintenance. Replace burnt-out bulbs or fixtures promptly to maintain optimal performance. Regularly clean the lights to prevent dust and grime buildup, ensuring consistent illumination.
If you encounter issues such as flickering, dimming, or loose connections, don’t hesitate to troubleshoot the problem. Check all wire connections and ensure they are securely fastened. If the issue persists, consult a professional electrician to diagnose and resolve the problem safely.
Throughout the installation process, remember to prioritize safety. Follow all electrical codes and regulations, and never attempt any electrical work you’re not qualified or comfortable performing. Hiring a licensed electrician may be the wisest choice, especially for complex wiring situations.
Frequently Asked Questions
Can I install under cabinet lighting myself, or should I hire a professional?
While it’s possible to install hardwired under cabinet lighting as a DIY project, it involves working with electrical wiring, which can be dangerous if not done correctly. If you’re confident in your electrical skills and comfortable following local codes and regulations, you can attempt the installation yourself. However, if you have any doubts or concerns, it’s advisable to hire a licensed electrician to ensure a safe and compliant installation.
What type of under cabinet lighting is best?
LED lighting is generally considered the best option for under cabinet lighting due to its energy efficiency, long lifespan, and bright, even illumination. LED lights also offer the flexibility of adjustable color temperatures and dimmability.
How do I determine the correct spacing for under cabinet lights?
Proper spacing is crucial for even illumination. As a general rule, space your under-cabinet lights 12 to 24 inches apart, depending on the fixture type and your desired level of brightness. Consult the manufacturer’s recommendations for specific spacing guidelines.
Can I use existing outlets or switches for my under-cabinet lighting?
Yes, if you have an existing outlet or switch in a convenient location, you can use it as a power source for your under-cabinet lighting. However, ensure that the circuit has sufficient capacity to handle the additional load of the new lighting.
How do I clean and maintain my under-cabinet lighting?
Regularly wipe down the light fixtures with a dry or slightly damp cloth to remove dust and grime. Avoid using harsh cleaning products, as they may damage the lights or their finishes. Additionally, replace any burnt-out bulbs or fixtures promptly to maintain optimal performance.

